In Stock
£161.13/unit (Ex. VAT)
-
- Price (Low to High)
- Price (High to Low)
-
- Price (Low to High)
- Price (High to Low)
In Stock
£41.63/unit (Ex. VAT)
-
- Price (Low to High)
- Price (High to Low)
In Stock
£1311.36/unit (Ex. VAT)
-
- Price (Low to High)
- Price (High to Low)

In Stock
£1292.21/unit (Ex. VAT)
-
- Price (Low to High)
- Price (High to Low)
In Stock
£963.96/unit (Ex. VAT)
-
- Price (Low to High)
- Price (High to Low)
In Stock
£1174.7/unit (Ex. VAT)
-
- Price (Low to High)
- Price (High to Low)
In Stock
£963.96/unit (Ex. VAT)
-
- Price (Low to High)
- Price (High to Low)
In Stock
£1590.09/unit (Ex. VAT)
-
- Price (Low to High)
- Price (High to Low)
In Stock
£1485.29/unit (Ex. VAT)
-
- Price (Low to High)
- Price (High to Low)
In Stock
£1199.62/unit (Ex. VAT)
-
- Price (Low to High)
- Price (High to Low)
-
- Price (Low to High)
- Price (High to Low)
In Stock
£1299.35/unit (Ex. VAT)
-
- Price (Low to High)
- Price (High to Low)
In Stock
£1162.91/unit (Ex. VAT)
-
- Price (Low to High)
- Price (High to Low)
In Stock
£963.96/unit (Ex. VAT)
-
- Price (Low to High)
- Price (High to Low)
In Stock
£1278.34/unit (Ex. VAT)
-
- Price (Low to High)
- Price (High to Low)
In Stock
£963.96/unit (Ex. VAT)
-
- Price (Low to High)
- Price (High to Low)
In Stock
£1239.42/unit (Ex. VAT)
-
- Price (Low to High)
- Price (High to Low)
In Stock
£1485.29/unit (Ex. VAT)
-
- Price (Low to High)
- Price (High to Low)
-
- Price (Low to High)
- Price (High to Low)
In Stock
£1204.96/unit (Ex. VAT)
-
- Price (Low to High)
- Price (High to Low)
In Stock
£1485.29/unit (Ex. VAT)
-
- Price (Low to High)
- Price (High to Low)
In Stock
£1485.29/unit (Ex. VAT)
-
- Price (Low to High)
- Price (High to Low)
In Stock
£1204.96/unit (Ex. VAT)
-
- Price (Low to High)
- Price (High to Low)
In Stock
£1590.09/unit (Ex. VAT)
-
- Price (Low to High)
- Price (High to Low)
In Stock
£963.96/unit (Ex. VAT)
-
- Price (Low to High)
- Price (High to Low)
In Stock
£1084.5/unit (Ex. VAT)
-
- Price (Low to High)
- Price (High to Low)
-
- Price (Low to High)
- Price (High to Low)
In Stock
£1155.29/unit (Ex. VAT)
-
- Price (Low to High)
- Price (High to Low)
In Stock
£1155.29/unit (Ex. VAT)
-
- Price (Low to High)
- Price (High to Low)
In Stock
£1155.29/unit (Ex. VAT)
-
- Price (Low to High)
- Price (High to Low)
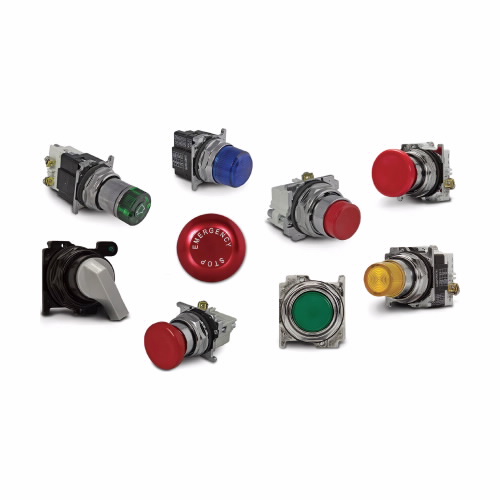
Working Mechanism
- The user applies force to the pushbutton operator.
- The pushbutton operator activates an internal switch mechanism.
- The switch mechanism sends a signal to the indicating light.
- The indicating light illuminates, providing visual feedback to the user.
- The user releases the pushbutton operator, deactivating the switch mechanism and turning off the indicating light.
Features
- They feature an oil-tight design for leakproof operations.
- These indicating lights are mechanically interlocked for enhanced user safety.
- They come with NEMA-rated enclosures to protect against dust, dirt and water.
Frequently Asked Questions
Q. How to clean Eaton E29 Series pushbutton indicating lights?
A.
- Turn off the power supply to the device where the pushbutton is installed to avoid any electrical shock.
- Disconnect the pushbutton from the power supply.
- Gently remove the pushbutton and indicate light from the panel or device.
- Use a soft and dry cloth to clean the surface of the pushbutton & indicating light. Avoid using any abrasive or harsh cleaning products that could damage the switch.
- Allow the switch to dry completely before reassembling and reconnecting it to the power supply.
- Finally, test the pushbutton and indicating light to make sure they are working properly.
Q. How to install these indicating lights?
A.
- Turn off the power supply to the device or control panel where you will be installing the pushbutton.
- Use a drill or hole saw to create the appropriate size hole in the panel or device.
- Place the pushbutton through the hole to ensure that the switch and indicator are properly aligned with the front of the panel.
- Install a mounting adapter or contact block to the back of the pushbutton.
- Secure the pushbutton in place using the provided locking ring or nut, tightening it by hand or with a wrench.
- Connect the wiring for the pushbutton according to the wiring diagram provided with the device or control panel.
Explore More
- DICKSON
- KEYSHAFT
- PEERLESS
- SPILFYTER
- WAHL
- Cleaning/Dip Tanks
- Milli/Micro Ohm Meters
- Filtration System Accessories
- Exterior Paints
- Door Kick Plates
- AKRO-MILS 30250 Akrobins Plastic Storage Bins
- ACCURIDE 3600 Series Heavy Duty Full Extension Slides
- ANSELL 74-048 Hyflex Uncoated Cut Resistant Gloves
- MECHANIX TAA M-Pact Covert Tactical Impact Resistant Gloves
- DEWALT Jigsaw Blade Set
- SPEARS VALVES Limit Switches And Transmitter Combinations
- APPROVED VENDOR Oval Slotted Plain Brass Wood Screws
- FOREVERBOLT 1/4"-20 Coarse NL-19 Hex Head Cap Screws
- TEMPCO Duraband (Micaband) Nozzle & Barrel Band Heaters